Learning Easy Dog Drawing - Your Simple Guide
Have you ever felt a little spark of desire to sketch out your furry friend, maybe a playful pup or a loyal companion, but thought it was just too tricky? Many people feel that way, you know, like drawing something that looks alive is a skill only for those who spend years in art school. Well, what if I told you that getting started with drawing dogs, especially in a way that feels pretty simple, is much more within reach than you might think? It's actually a wonderful way to connect with your own creativity, and perhaps even with the spirit of those adorable four-legged creatures we love so much.
There's a real joy that comes from putting pencil to paper and seeing a shape come to life, even if it's just a few lines at first. You don't need fancy art supplies or years of experience to make a picture of a dog that makes you smile. The true beauty of this kind of creative expression is that it's open to everyone, regardless of their past attempts or how they feel about their artistic abilities. It's more about having a good time and letting your hand move freely.
This guide is here to show you some straightforward moves that can help you create a picture of a dog without a lot of fuss. We'll look at breaking down the shapes, putting in the features, and giving your drawing a bit of personality. So, if you're ready to give it a go, just grab something to draw with and something to draw on. It's really that simple to get going, you see.
Table of Contents
- Getting Started with Simple Shapes for an Easy Dog Drawing
- What basic forms help with easy dog drawing?
- Giving Your Dog Character - Adding Features
- How do you make an easy dog drawing look lively?
- Bringing Your Dog to Life - Fur and Details
- Are there tricks for fur in an easy dog drawing?
- Common Questions About Your Easy Dog Drawing
- What if my easy dog drawing doesn't look right?
- Tools and Practice for Your Easy Dog Drawing
- Keeping it up - Your Easy Dog Drawing Journey
Getting Started with Simple Shapes for an Easy Dog Drawing
When you first think about drawing a dog, it might seem like a lot of different parts all put together. But, really, every drawing starts with just a few basic forms. Think of it like building with blocks, sort of. You put down one simple shape, then another, and before you know it, you have the beginnings of something recognizable. This way of working helps to keep things from feeling too overwhelming, which is a common feeling when you're just starting out with any kind of picture-making.
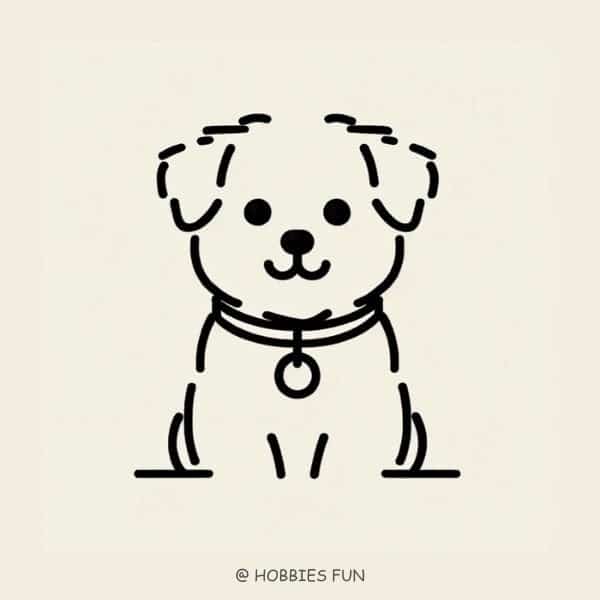
For an easy dog drawing, the first step is often to put down a couple of round or oval shapes. These will be the main parts of your dog's body. One slightly larger oval can be the body itself, and a smaller, perhaps more circular shape, can be the head. You don't need to press hard with your pencil; just light lines are fine for these initial marks. You can always make them darker later, you know.
Consider the direction your dog is facing. Is it looking straight at you, or is its body turned a little? This will affect how you place your basic shapes. If the dog is turned, those ovals might overlap a bit more, showing that one part is in front of the other. It's like seeing a person from the side; you still see their head and body, but they are positioned differently than if they were facing you directly, basically.
After you have those main body and head shapes down, you can start to think about the neck. This is often just a couple of lines connecting the head shape to the body shape. It helps to give the dog a bit of structure and keeps the head from looking like it's just floating. You want it to look like it belongs, you see.
Legs are next. For a truly easy dog drawing, you can start with simple stick-like lines for the legs, or even just long, narrow oval shapes. Think about how many legs you can see from your chosen view. Usually, you'll see two in the front and two in the back, or maybe just three if the dog is turned a certain way. They don't have to be perfect at this stage, just placed where they should go.
The tail is another simple form. It can be a curved line, a straight line, or a fluffy shape, depending on the kind of dog you're picturing. Just add it to the back of the body shape. It helps to give the dog a sense of balance and movement, you know, even if it's just standing still.
It's all about building up from the very simplest forms. Don't worry about getting every detail right away. The goal here is to get the general idea of the dog's body down on paper. This foundational step is really what makes the whole process feel much less intimidating. You're just putting down the skeleton, in a way.
What basic forms help with easy dog drawing?
The core building blocks for any easy dog drawing are circles, ovals, and sometimes even a few square-like or rectangular shapes. These are your starting points, the things you put down before anything else. Think of a dog's head as a circle, its body as a big oval, and its snout as a smaller oval or a gentle rectangle. This approach simplifies the whole animal into shapes you probably already feel comfortable putting on paper.
For the head, a simple circle is often the best way to begin. This circle will eventually become the main part of the dog's face. You can then add a smaller, slightly elongated oval for the muzzle or snout, extending from the front of that head circle. This immediately gives you a sense of the dog's face shape, which is pretty important, actually.
The body, as mentioned, usually starts as a larger oval. The size and shape of this oval will depend on the type of dog you're drawing. A long-bodied dog, like a Dachshund, would have a very stretched-out oval, while a more compact dog might have a rounder one. It's all about observing the general outline, you see.
Legs can be thought of as pairs of narrow ovals or even simple lines with circles for the joints, if you want to get a little more detailed. For a truly easy dog drawing, just two lines for each leg, ending in a simple foot shape, works perfectly well. The idea is to get the placement right first, then you can worry about the specific muscle shapes later, if you even want to.
Even the ears can start as simple triangles or leaf-like shapes attached to the head circle. A floppy ear might be a curved triangle, while a pointy ear would be a straight-sided one. The tail, too, can be a simple curved line or a fluffy cloud shape. These basic forms give you a framework to build upon, making the whole process feel very approachable. It's almost like connecting the dots, in a way.
Giving Your Dog Character - Adding Features
Once you have the basic body outline and head shape, the next step is to add the features that make your dog look like a dog, and more importantly, give it a unique feel. These are the eyes, nose, mouth, and ears. These small additions can really change the entire mood of your easy dog drawing. A slight change in an eyebrow or the curve of a mouth can make a big difference, you know.
Start with the eyes. They are often placed roughly in the middle of the head circle, with a little space between them. For a simple dog drawing, two small circles or ovals can work as eyes. You can add a tiny dot inside each for the pupil, or a small white highlight to give them a bit of sparkle. The way you draw the eyes can show if the dog is happy, sleepy, or even a little bit curious, you see.
The nose is usually positioned below the eyes, at the end of the muzzle shape you drew earlier. A simple dog nose can be a curved triangle or an upside-down heart shape. You can add two small dots or lines for the nostrils. This helps to define the dog's face and gives it a central point. It's kind of like the anchor for the whole face, in some respects.
The mouth can be a simple curved line extending from the bottom of the nose. A gentle upward curve suggests a happy dog, while a straight line might mean a more neutral expression. You can add a small line underneath for the chin, too. Sometimes, just a tiny bit of a tongue sticking out can add a lot of charm to your easy dog drawing, actually.
Ears come in all sorts of shapes and sizes, and they really help to show what kind of dog you're drawing. Are they pointy, floppy, or somewhere in between? Attach them to the sides or top of the head circle. For floppy ears, draw a curved line down from the head. For pointy ears, use two straight lines meeting at a point. You can even add a little bit of shading inside the ear to give it some depth, if you want to, you know.
Don't forget the eyebrows! Even a simple line above each eye can add a lot of personality. A raised eyebrow can make your dog look surprised, while two downward-sloping lines can make it look a little bit sad or thoughtful. These small details, while seemingly minor, contribute a lot to the overall expression of your drawn dog. They are pretty important, really.
Adding these features is where your easy dog drawing starts to truly take on a life of its own. It's about bringing out the dog's unique spirit on paper. Take your time with these parts, as they are often what people look at first when they see your artwork. They are the windows to the dog's character, sort of.
How do you make an easy dog drawing look lively?
Making an easy dog drawing look lively really comes down to a few clever tricks that suggest movement and emotion. It's not about drawing every single hair, but about creating the *feeling* of a living creature. One way to do this is through the eyes. Eyes that have a small, bright highlight in them can make the dog seem more alert and aware. It's like a tiny spark of life, you know.
Another way to add life is through the pose. Even a simple dog drawing can look more dynamic if it's not just standing perfectly still. Maybe one paw is slightly lifted, or its head is tilted a little. A slight curve in the spine can also suggest a more natural, relaxed posture rather than a stiff, upright one. These small shifts in position make a big difference, you see.
The tail is also a fantastic tool for showing emotion and movement. A wagging tail can be drawn with a few blurred lines behind it, or by showing it in a slightly raised, curved position. A tail tucked between the legs can show shyness or fear. Even a simple, gently curved tail can suggest a calm, content dog. It's a surprisingly expressive part of the dog's body, actually.
Expression on the face is key. As mentioned before, the eyes and eyebrows play a huge role. A slight crinkle around the eyes can show happiness, or a furrowed brow can show concentration. The mouth, too, can be drawn with a slight curve to suggest a smile, or even an open mouth with a bit of tongue showing for a panting, playful look. These little facial cues are very powerful, really.
Adding a few lines to suggest fur direction, especially around the neck or where the fur might be a bit ruffled, can also give a sense of texture and softness, making the dog seem more real. You don't need to draw every hair, just enough to give the impression of fur. It's about suggestion, not detailed replication, you know. This helps the easy dog drawing feel more tactile, in a way.
Finally, consider adding a very simple background element, like a patch of grass or a floor line. This grounds the dog in its surroundings and makes it feel less like it's floating in space. A simple shadow underneath the dog can also make it seem like it's actually sitting or standing on a surface. These small environmental touches really bring the whole picture together, you see.
Bringing Your Dog to Life - Fur and Details
Once your dog has its basic shape and features, you can start to think about adding texture and those smaller elements that truly make it look like a specific kind of dog. This is where you can suggest fur, paws, and other little things that add character. It's not about making it perfectly realistic, but about giving your easy dog drawing more depth and personality, you know.
For fur, you don't need to draw individual hairs. That would take a very long time and might make your drawing look too busy. Instead, think about the direction the fur grows on different parts of the dog's body. Use short, light lines that follow the curves of the body. For example, fur on the legs might go downwards, while fur on the back might lie flat. This creates a sense of texture without being overly detailed, you see.
If you're drawing a fluffy dog, you can use slightly curlier or wavier lines, especially around the edges of the body, to suggest that soft, voluminous coat. For a short-haired dog, your lines can be even shorter and closer together, or you might just use some light shading to imply a smooth surface. It's about finding the right feel for the fur, in some respects.
Paws are another area where you can add a little more detail. Instead of just a rounded end to the leg, you can suggest individual toes with a few curved lines. You can also add a small, rounded shape for the paw pad. Even if it's just a couple of lines, it makes the paws look more defined and realistic, which is pretty important, actually.
Think about collars or tags. If your dog wears one, adding a simple band around the neck and a small hanging shape for a tag can make your drawing feel more personal. These little accessories often tell a story about the dog, you know, and they can be quite fun to include in your easy dog drawing.
Spots or patterns are also great ways to add specific details. If your dog has patches of different colors, you can lightly outline these areas. You don't need to color them in unless you want to, but just indicating where they are can make your drawing look much more like the dog you're picturing. It's like giving it its own unique markings, you see.
Finally, consider very light shading. This can give your dog drawing a sense of three dimensions. Think about where the light might be coming from. Areas that are further away from the light source, like under the chin or on the underside of the belly, might be a little darker. Just use the side of your pencil to add a soft layer of gray. This makes your easy dog drawing pop a little, sort of.
Are there tricks for fur in an easy dog drawing?
Absolutely, there are some simple tricks for suggesting fur in an easy dog drawing without getting bogged down in drawing every single strand. The main idea is to use your lines to *imply* fur rather than drawing it all out. One good trick is to use short, quick strokes that follow the general direction the fur grows on the dog's body. So, on the back, strokes might go downwards, while on the legs, they might wrap around a bit. This gives a natural flow, you know.
Another trick is to vary the pressure you put on your pencil. For areas where the fur is thicker or creates shadows, you can press a little harder. For lighter areas or where the fur is sparse, use a very light touch. This variation in line weight helps to create depth and texture, making the fur seem more believable, which is pretty effective, actually.
Consider using "broken" lines for the outline of the dog. Instead of one continuous line for the edge of the body, use a series of short, slightly jagged lines. This immediately gives the impression of a furry edge, rather than a smooth, cartoon-like one. It's a quick way to add that furry feel to your easy dog drawing, you see.
For shaggy or curly fur, you can use small, looped strokes or squiggly lines. Don't make them too uniform; a bit of randomness makes it look more natural. Think about how a cloud looks, with soft, irregular edges. You're trying to capture that same kind of soft, uneven texture for the fur, in some respects.
You can also use negative space. Instead of drawing the fur itself, sometimes you can just draw the *absence* of fur, or the shapes *around* the fur. For example, if a dog has very fluffy cheeks, you might draw the outline of the cheek fluff, and then just lightly shade inside, letting the white of the paper suggest the lighter fur. It's a clever way to work, sort of.
Finally, remember that less is often more when it comes to fur. You don't need to cover the entire dog in lines. Just a few well-placed strokes in key areas, like around the head, the back, and the legs, can be enough to give the impression of fur. Your eye will fill in the rest, you know. This keeps your easy dog drawing from looking too busy or overworked, which is a common pitfall.
Common Questions About Your Easy Dog Drawing
It's totally normal to have questions as you're trying out something new, especially when it comes to drawing. You might wonder if you're doing it "right" or if there's a better way to approach certain parts. The good news is that with drawing, especially an easy dog drawing, there's no single "right" way. It's more about finding what works for you and having a good time with it, you see.
One common question is about symmetry. Do both sides of the dog need to be exactly the same? Not at all! In real life, dogs (and people) are not perfectly symmetrical. A little bit of difference between the two sides can actually make your drawing look more natural and alive. So, don't worry if one ear is slightly higher than the other, or if one eye looks a tiny bit different. It adds character, you know.
Another question often comes up about mistakes. What if you draw a line in the wrong place? That's what erasers are for! Drawing is a process of building up and refining. It's perfectly fine to draw a line, realize it's not quite right, and then gently erase it and try again. Every artist, no matter how experienced, uses their eraser. It's just part of the creative journey, sort of.
People also ask about drawing different dog breeds. Do you have to learn a new way to draw for every single breed? Not really. The basic shapes and principles we've discussed apply to all dogs. The differences between breeds are often just variations in the size and shape of those basic forms, or in the type of fur. Once you get comfortable with the general dog shape, you can then adjust it to fit a specific breed. For example, a greyhound might have a very long, slender body oval, while a bulldog would have a more compact, sturdy one, you know.
What about drawing dogs in motion? While this guide focuses on easy dog drawing, which usually means a stationary dog, the principles of basic shapes still apply. You just have to think about how those shapes change when the dog is running or jumping. For a simple approach, you can suggest motion by adding a few light lines behind the dog's legs or tail, like a blur. This gives the impression of speed without needing to draw complex anatomy, actually.
And finally, a very common thought is, "I'm just not good at drawing." This isn't a question, but a feeling many people have. The truth is, drawing is a skill, and like any skill, it gets better with practice. The goal of an easy dog drawing isn't perfection, but enjoyment and progress. Every line you draw, even if it's not exactly what you pictured, is a step forward. Just keep at it
🐶 38 Cute Easy Dog Drawing Ideas

🐶 37+ Easy Cute Dog Drawing Ideas - Draw In Fun
🐶 38 Cute Easy Dog Drawing Ideas
