Mastering The Art Of Drawing A Bow: A Simple Guide For All Skill Levels
Bows are charming, versatile elements that can add a touch of elegance, fun, or festivity to any drawing. From a neatly tied gift bow to a flowing ribbon in someone's hair, or even a simple shoelace knot, learning to draw a bow is a fundamental skill that opens up a world of creative possibilities. You might think, "Drawing a bow may seem tricky at first." And indeed, many aspiring artists feel that way. However, with a few simple steps and a bit of practice, it becomes surprisingly simple!
Learning to draw a bow is a fun and rewarding activity, whether for a school project, an art piece, or just for personal enjoyment. There are an endless number of ways you can draw a bow, as they come in different sizes, shapes, and styles. This guide will walk you through the process of drawing a classic ribbon bow, from the very first stroke to the finishing touches, making it accessible for artists of all ages and skill levels. We'll also explore essential tools, warm-up exercises, and even touch upon the exciting world of digital art applications that can enhance your drawing journey.
Getting Started: Essential Tools and Warm-Ups
Before you dive into drawing, it's always a good idea to gather your materials and prepare your mind and hand. For traditional drawing, all you really need is a pencil, an eraser, and some paper. However, the world of art has expanded significantly, offering fantastic digital alternatives that provide immense flexibility and convenience.
Digital Drawing Tools at Your Fingertips
If you prefer the digital canvas, you're in luck! There are many excellent platforms available. Imagine a free online drawing application for all ages, allowing you to create digital artwork to share online and export to popular image formats like JPEG, PNG, SVG, and PDF. Such applications often let you paint online with natural brushes, utilize layers for complex compositions, and easily edit your drawings. You can import, save, and upload images, giving you complete control over your creative process. Many of these tools are inspired by professional software like Paint Tool SAI, Oekaki Shi Painter, and Harmony, bringing advanced features right to your browser or device.
The Importance of Sketching
No matter if you're drawing traditionally or digitally, sketching is a great warm-up exercise. It's incredibly beneficial in working through some rough ideas of how you want to draw something. Before committing to final lines, a quick sketch allows you to experiment with different proportions, angles, and styles without fear of making a mistake. It helps loosen up your hand and gets your creative juices flowing, setting the stage for a more confident and successful drawing experience.
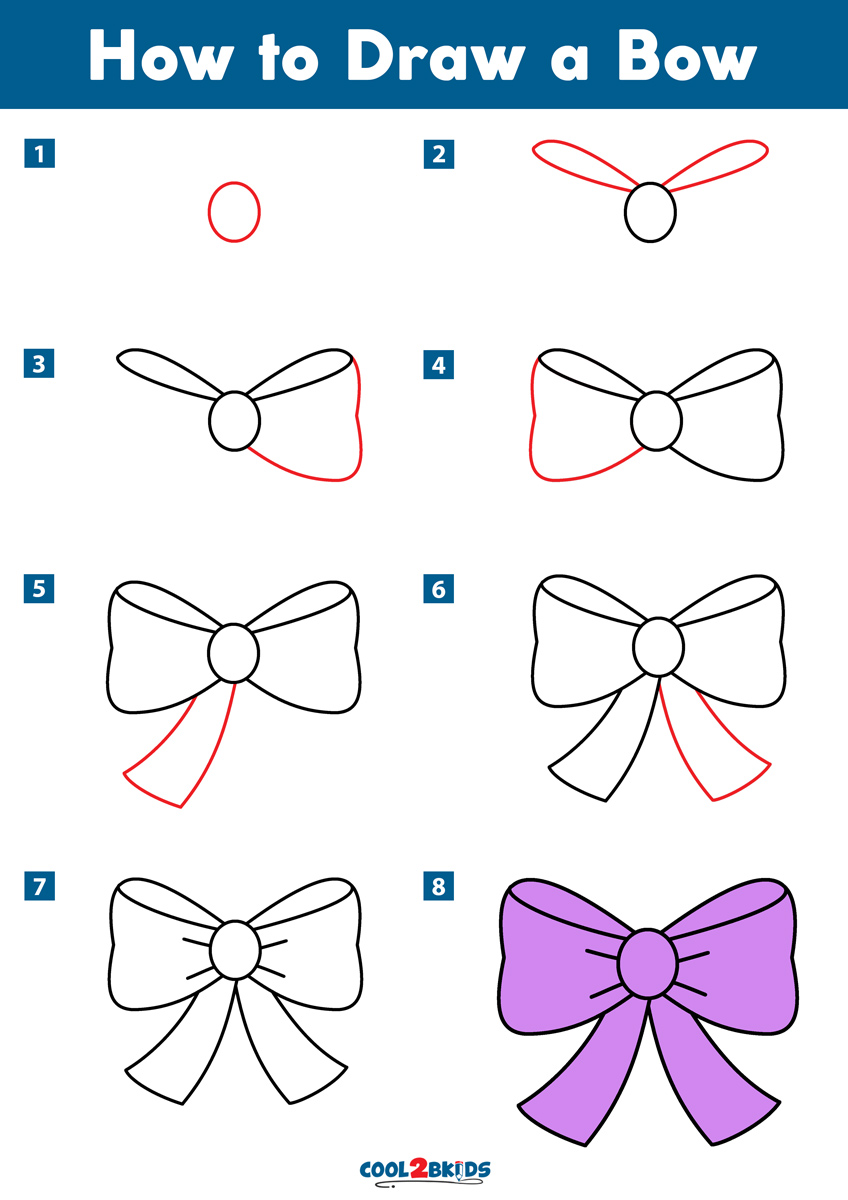
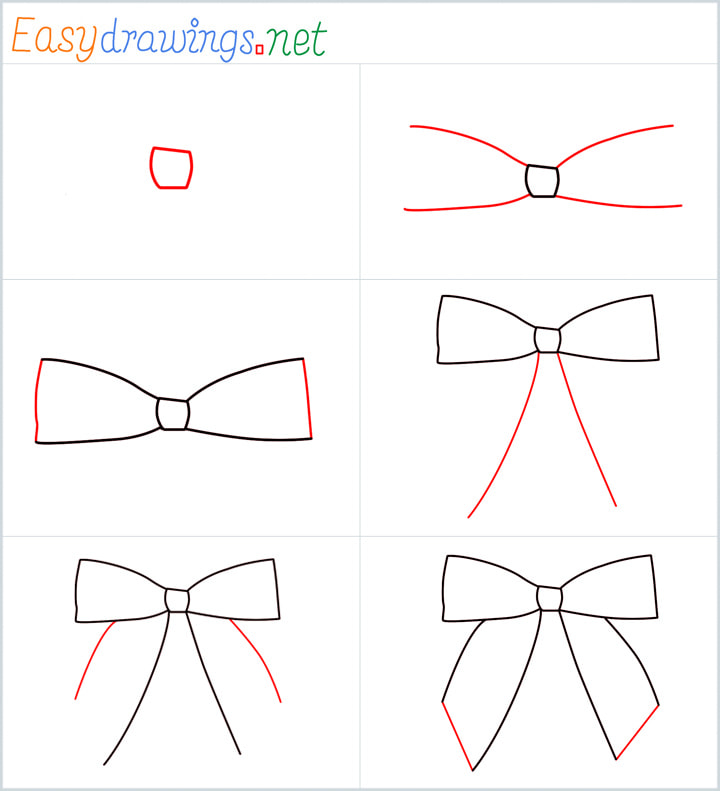
Step-by-Step Guide: How to Draw a Classic Ribbon Bow
Now, let's get to the heart of the matter: drawing the bow itself. Remember, there are countless variations, but mastering the basic structure will allow you to confidently tackle any type of bow you wish to create. We'll focus on a standard, symmetrical ribbon bow.
Step 1: Laying the Foundation – The Middle Knot
Every bow needs a central point from which its loops and tails originate. This is often referred to as the knot or the middle of the bow. To begin, you will start drawing the middle of the bow. This might sound intimidating, but it's quite simple.
- To complete this step, you have to draw two similar short curved lines opposite each other. Imagine drawing a small, horizontal oval that's slightly pinched in the middle. These two curves will form the basic shape of the knot, giving it a sense of dimension and tightness.
- Don't worry about perfection at this stage; these are just your foundational lines.
Step 2: Forming the Loops
Once your middle knot is established, it's time to bring the iconic loops of the bow to life. These loops are what give the bow its characteristic puffy appearance.
- Starting from one side of your middle knot, draw a round, widening curve. For instance, if you start from the left side of the knot, place your drawing utensil (pen, pencil, or marker) about 1/2 inch (1.3 cm) to the left of the bow knot at the same height as the center. From this point, draw an upward and outward curve, then bring it back down towards the bottom of the knot, creating a balloon-like shape.
- Repeat this process on the opposite side of the knot, mirroring your first loop. Aim for symmetry, but a little natural variation can add character.
- The final part of this step is to connect the ends of the curves you just drew. This means closing off the loop shapes you've created. Ensure your lines flow smoothly from the knot and back into it, giving the impression of a continuous ribbon. You're essentially drawing the outer and inner edges of each loop.
Step 3: Adding the Tails and Finishing Touches
No bow is complete without its flowing tails! These add movement and elegance to your drawing.
- From the bottom of your middle knot, draw two downward-curving lines for the tails. These can be straight, wavy, or even crisscrossed, depending on the style you're aiming for. Consider how the ribbon would naturally fall.
- You can add a V-cut or a diagonal cut to the ends of the tails for a classic ribbon finish.
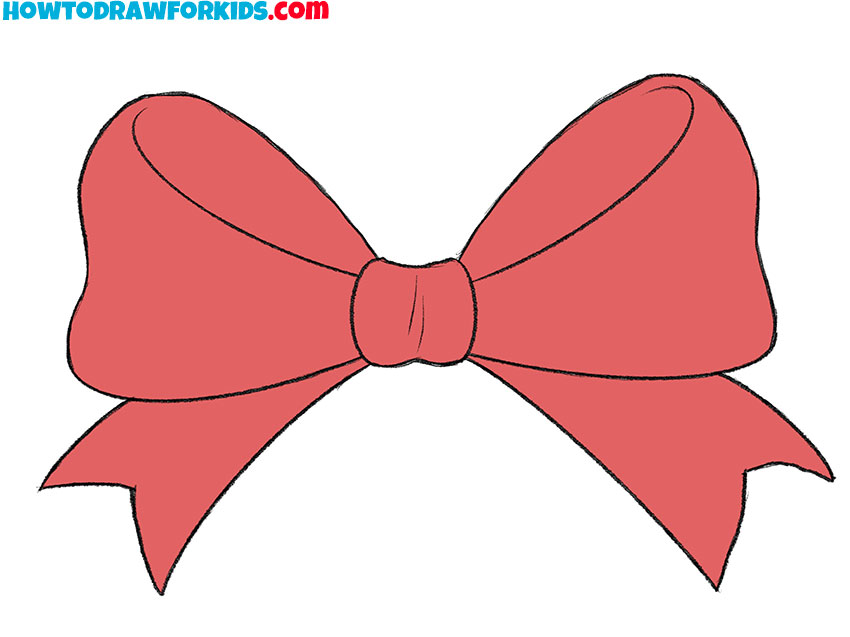
- Finally, refine your lines. Erase any unnecessary sketch lines, darken the lines you want to keep, and add details. You can add subtle folds or creases within the loops and tails to suggest the fabric of the ribbon. Consider adding a bit of shading to give your bow more depth and dimension, making it pop off the page.
Tips for Elevating Your Bow Drawings
Once you've mastered the basic bow, don't stop there! The world of bows is vast and exciting. Here are a few tips to help you take your bow drawings to the next level:
- Experiment with Variety: Remember, there are different sizes and shapes of bows. Try drawing a small, tight bow for a gift, a large, floppy bow for a hair accessory, or even a more stylized, abstract bow. Each type presents unique challenges and opportunities for creativity.
- Add Texture and Dimension: Think about the material of the ribbon. Is it silk, velvet, or grosgrain? Adding subtle lines, highlights, and shadows can convey different textures and make your bow look more realistic and three-dimensional.
- Use References: Don't hesitate to look at real bows or photographs for inspiration. Just like when you watch a video tutorial (e.g., "In this video, we show you how you can start your first real bow drawing"), visual references can provide invaluable insights into how light interacts with the ribbon and how the fabric folds naturally.
- Practice, Practice, Practice: Like any skill, drawing improves with consistent practice. The more bows you draw, the more intuitive the process will become, and the more confident you'll be in creating unique and beautiful designs.
Conclusion
As we've seen, drawing a bow may seem tricky at first, but with a few simple steps, it becomes a straightforward and enjoyable process. From understanding the basic structure of the middle knot and loops to adding the elegant tails and refining your lines, you now have the tools to create beautiful bows. Whether you're drawing for a school project, an art piece, or simply for the joy of creation, learning to draw a bow is a fun and rewarding activity that enhances your artistic repertoire. So grab your drawing utensil, start sketching, and let your creativity flow!
Summary: This article provided a comprehensive guide on how to draw a classic ribbon bow, emphasizing that while it may seem tricky initially, it becomes simple with a step-by-step approach. It covered essential drawing tools, including the benefits of free online digital drawing applications inspired by professional software, and highlighted the importance of sketching as a warm-up. The core of the guide detailed the process in three key steps: starting with the middle knot using two short curved lines, forming the loops by drawing round, widening curves and connecting their ends, and finally, adding the tails and refining the drawing with finishing touches. The article concluded with tips for elevating bow drawings through experimentation, adding texture, using references, and consistent practice, encouraging readers to embrace the fun and rewarding activity of drawing bows.
How To Draw A Bow Step By Step
How To Draw A Bow Step By Step
How To Draw A Bow Ribbon
