Dive Deep: How To Draw An Awesome Shark (A Comprehensive Guide For All Ages)
Sharks are undoubtedly one of the most iconic and, for many, feared creatures of the ocean. Their sleek, powerful forms and mysterious aura make them fascinating subjects for artists of all skill levels. Whether you're a budding artist, a curious kid, or just looking for a fun new creative challenge, learning how to draw a shark can be an incredibly rewarding experience. If you want to learn to draw a shark, you’ve come to the right place!
This guide is designed to make the process simple, enjoyable, and accessible for everyone. We'll cover everything from the basic tools you'll need to step-by-step instructions for drawing various shark types, from a simple cartoon shark to a more realistic great white. So, grab your art supplies, get ready to unleash your creativity, and let's dive into the exciting world of shark drawing!
Getting Started: Your Drawing Essentials
Before you begin sketching, it's helpful to gather your tools. The beauty of drawing is that you can start with very little, or explore a vast array of digital possibilities. Both traditional and digital methods offer unique advantages, and we'll touch upon both to ensure you're well-equipped.
Traditional Tools: Paper and Pencil
For those who love the tactile feel of pencil on paper, the requirements are wonderfully simple. You don't need much to get started, which makes it perfect for impromptu drawing sessions or a fun Friday group activity.
- Paper: Any type of paper will do, from a simple sketchpad to a plain sheet of printer paper.
- Pencils: A basic graphite pencil (HB, 2B, or 4B are good starting points) is perfect for sketching and outlining. You might also want an eraser for corrections.
- Coloring Tools (Optional): If you plan to add color, consider colored pencils, markers, or crayons.
Just grab a piece of paper, a pencil, and get ready to have fun!
Embracing Digital Art with Sketchpad
In today's digital age, online drawing applications offer incredible flexibility and powerful tools, often for free. One excellent option is Sketchpad, a free online drawing application for all ages. It's incredibly versatile and perfect for creating digital artwork to share online and export to popular image formats like JPEG, PNG, SVG, and PDF.
Sketchpad isn't just for drawing; you can easily draw, edit photos, or even design your next business card. This makes it an invaluable tool for crafting images for social media posts, digital ads, paper, or even apparel. Its user-friendly interface means you can make a quick photo edit with the drag and drop feature, or dive deep into its advanced functionalities.
For those looking to maximize their digital drawing experience, Sketchpad offers some neat shortcuts:
- Style Chooser Shortcut: Simply draw the letter “s” to take a shortcut to the style chooser, allowing you to quickly switch between different brushes and effects.
- Tool Presets: While holding the button, tap the screen with different finger combinations to access tool presets that have been setup in the tool. This can significantly speed up your workflow.
If you're new to digital art or Sketchpad, don't worry! Everything you need to know about Sketchpad is readily available. You can watch videos for tips and tricks on how to use Sketchpad and get the most out of the app! This makes it an ideal platform for beginners and kids to explore their artistic potential without needing expensive software.
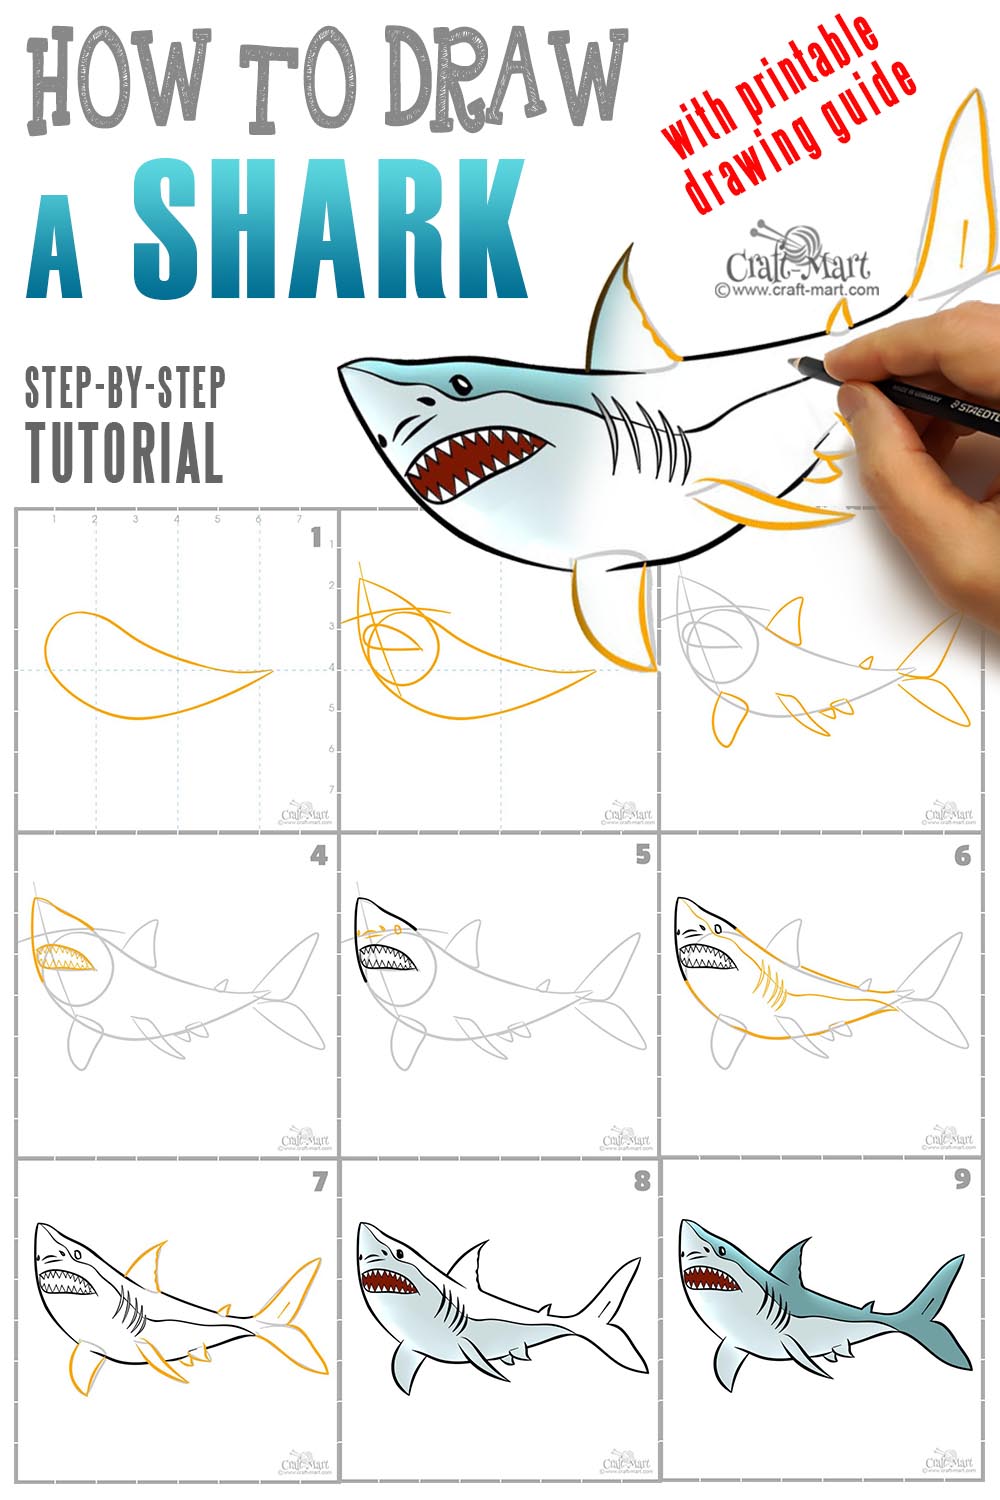
The Art of Drawing Sharks: Step-by-Step Guidance
Now for the exciting part: learning how to draw a shark step by step! This page contains all of our fun shark lessons, designed with easy tips on shapes, fins, and coloring. It's perfect for beginners and kids, ensuring a smooth and enjoyable learning curve.
Mastering Basic Shapes (The Foundation)
Every great drawing starts with simple shapes. Think of your shark as a collection of ovals, triangles, and lines. This approach simplifies the process and helps you get the proportions right.
- The Body: Start with a long, slightly tapered oval for the main body of the shark. Make the front end slightly wider for the head and the back end narrower for the tail.
- The Head: Add a smaller, rounded shape at the front of the body for the head.
- The Fins:
- Dorsal Fin: Draw a prominent triangle on the top of the body, closer to the head. This is the iconic shark fin!
- Pectoral Fins: Add two elongated, somewhat triangular shapes on either side of the body, just behind the head. These are like the shark's "wings."
- Caudal Fin (Tail): Sketch a crescent or two-lobed shape at the very end of the body. Sharks have powerful tails for propulsion.
Remember to sketch lightly at this stage. These are just your guidelines.
Adding Detail and Form
Once your basic shapes are in place, it's time to refine them and bring your shark to life.
- Connecting Shapes: Smoothly connect your initial shapes, refining the outline of the shark's body, head, and fins. Give the body a sleek, hydrodynamic curve.
- Eyes and Gills: Add a small, round eye on the side of the head. For the gills, draw several short, vertical slits behind the eye.
- Mouth: Sketch the shark's mouth. This can range from a simple curve for a cartoon shark to a more menacing, jagged line for a realistic one. Remember, sharks often have a mouth that extends far back on their head.
- Fin Refinement: Give the fins more definition. The dorsal fin should have a sharp point, and the pectoral fins should look strong and broad. The tail fin can be symmetrical or have a slightly larger upper lobe, depending on the shark species.
Exploring Different Shark Styles & Species
The ocean is home to a vast array of sharks, each with unique characteristics. You can follow these quick, easy steps and learn how to draw a simple shark, a cartoon shark, a bull shark, or even a sand tiger shark. Here are some tips for different approaches:
- Simple/Cartoon Shark: Exaggerate features! Give it bigger eyes, a friendly smile, or even a silly expression. Focus on clean lines and minimal detail. This style is fantastic for younger artists or quick, fun sketches.
- Realistic Great White Shark: Learn how to draw a realistic great white shark! Focus on accurate proportions, the distinct triangular dorsal fin, and the powerful, torpedo-shaped body. Pay attention to shading to create depth and texture, especially around the gills and eyes. Great whites have a very specific snout shape and a broad, powerful tail.
- Bull Shark: Known for their stocky build and blunt snout. When drawing a bull shark, emphasize their robust body and relatively small eyes. Their powerful jaws are also a key feature.
- Sand Tiger Shark: These sharks are famous for their perpetually exposed, jagged teeth, even when their mouths are closed. Highlight these distinctive teeth and their slender body shape.
Experiment with different styles! Here are seven different styles you can explore, from playful to truly lifelike, by simply adjusting proportions and details.
Bringing Your Shark to Life with Color and Shading
Once your lines are complete, adding color and shading will make your shark pop!
- Basic Coloring: Most sharks are shades of gray, blue-gray, or brownish-gray on top, with lighter undersides (countershading). Apply your base colors evenly.
- Shading for Depth: Use a darker shade of your base color to add shadows. Think about where light would hit the shark. Shadows will typically be on the underside, around the gills, and where fins meet the body. This creates a 3D effect.
- Highlights: Use a lighter color or an eraser to add highlights where light would reflect most strongly, like on the top of the dorsal fin or the snout.
- Water Effects (Optional): A few wavy lines or a subtle blue wash around your shark can help place it in its natural environment.
Beyond the Basics: Tips for Improvement and Fun
Drawing is a journey, not a destination. To continue improving and keep the fun alive, consider these tips:
- Practice, Practice, Practice: The more you draw, the better you'll get. Don't be afraid to make mistakes; they are part of the learning process.
- Watch Videos: Visual learning can be incredibly effective. Watch our step by step video here! Look for tutorials on specific shark species or drawing techniques that interest you.
- Observe Real Sharks: Look at photos and videos of real sharks. Pay attention to their anatomy, how their fins move, and the textures of their skin. This will help you create more realistic and dynamic drawings.
- Experiment with Tools: If you're using Sketchpad, try out different brushes, colors, and effects. If you're drawing traditionally, experiment with different types of pencils or coloring mediums.
- Draw with Others: Make it a fun Friday group activity! Drawing with friends or family can be a great way to share ideas, get feedback, and motivate each other. Or simply keep it on hand for a quick creative break whenever inspiration strikes.
- Explore More Lessons: Remember, this page contains all of our fun shark lessons. Don't stop at just one! Try drawing different angles, expressions, or even sharks interacting with other marine life.
Conclusion
Learning how to draw awesome sharks is an incredibly rewarding endeavor that's accessible to everyone, regardless of age or experience level. By starting with simple shapes, gradually adding detail, and experimenting with different styles, you can bring these magnificent ocean predators to life on paper or screen. Whether you prefer the classic feel of pencil and paper or the versatile power of digital tools like Sketchpad, the most important thing is to have fun and let your creativity flow. So keep practicing, keep exploring, and enjoy the wonderful world of drawing!
How To Draw A Shark

Shark Drawing Ideas How to draw a Shark Step by Step
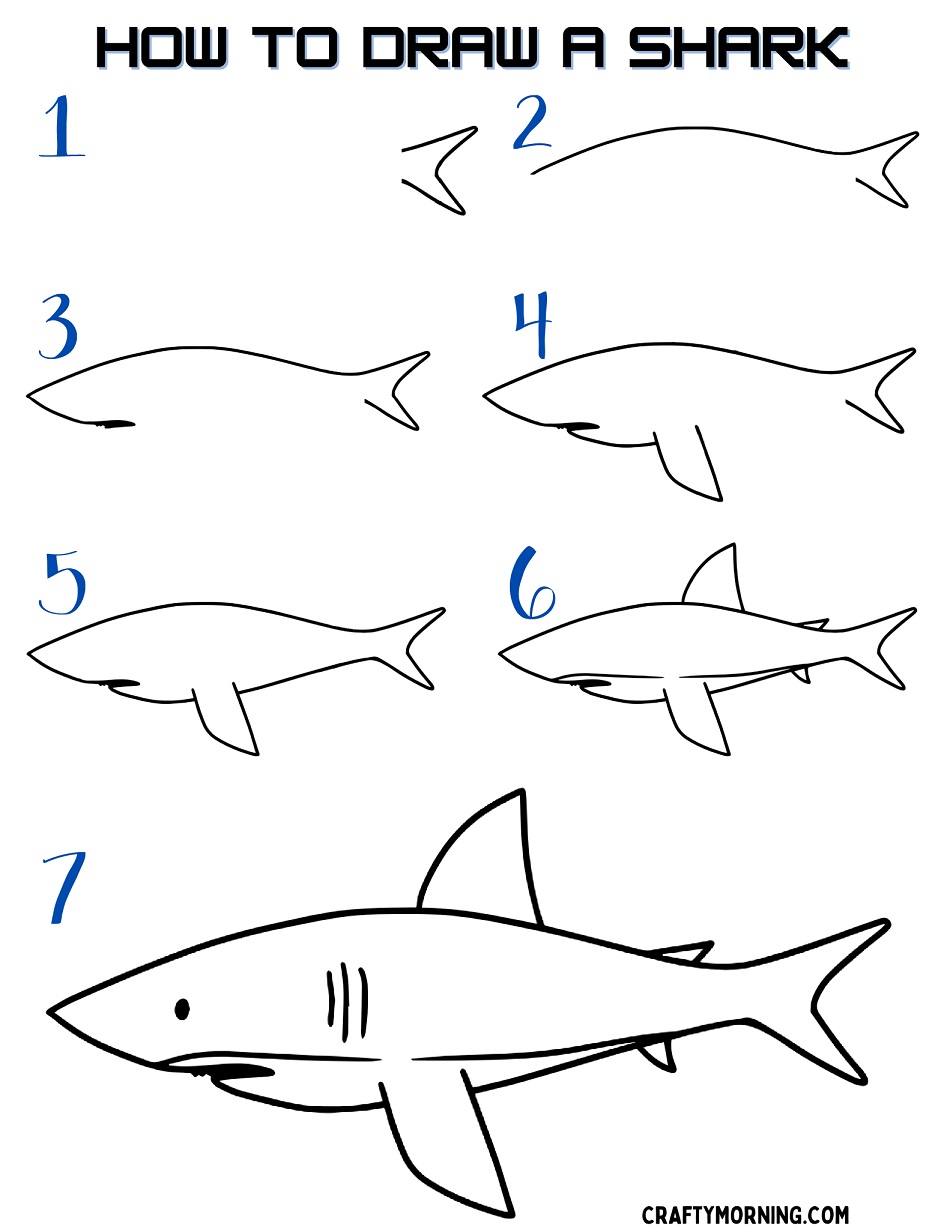
How to Draw a Shark (Easy Step by Step) - Crafty Morning
